Xenophage is a top-tier Exotic Heavy Machine Gun and has been since its introduction in the Shadowkeep expansion. Though there are more optimal DPS choices in Destiny 2, you’ll want to know how to get this weapon. That’s because Xenophage has high burst potential and relatively good ammo economy. Here’s how to complete The Journey Exotic quest.
How to Get the Xenophage Exotic Machine Gun in Destiny 2
To get Xenophage, you’ll need to complete an Exotic quest called The Journey. Even starting the quest is a bit complicated. We’ll go over all the steps below.
How to Start The Journey Quest in Destiny 2
To start The Journey Exotic quest, be sure that you own the Shadowkeep expansion, then head to Sorrow’s Harbor on the Moon.
Travel to the northern edge of the area and enter the Scarlet Keep, taking the leftmost doorway. Travel until you reach a light greenlit hallway, and keep an eye out for another passageway in the upper-right wall.
Jump into the passage, and follow it until you reach the chamber, where you can see the Lunar Pyramid and two Hive statues on either side.
 Screenshot by GameSkinny
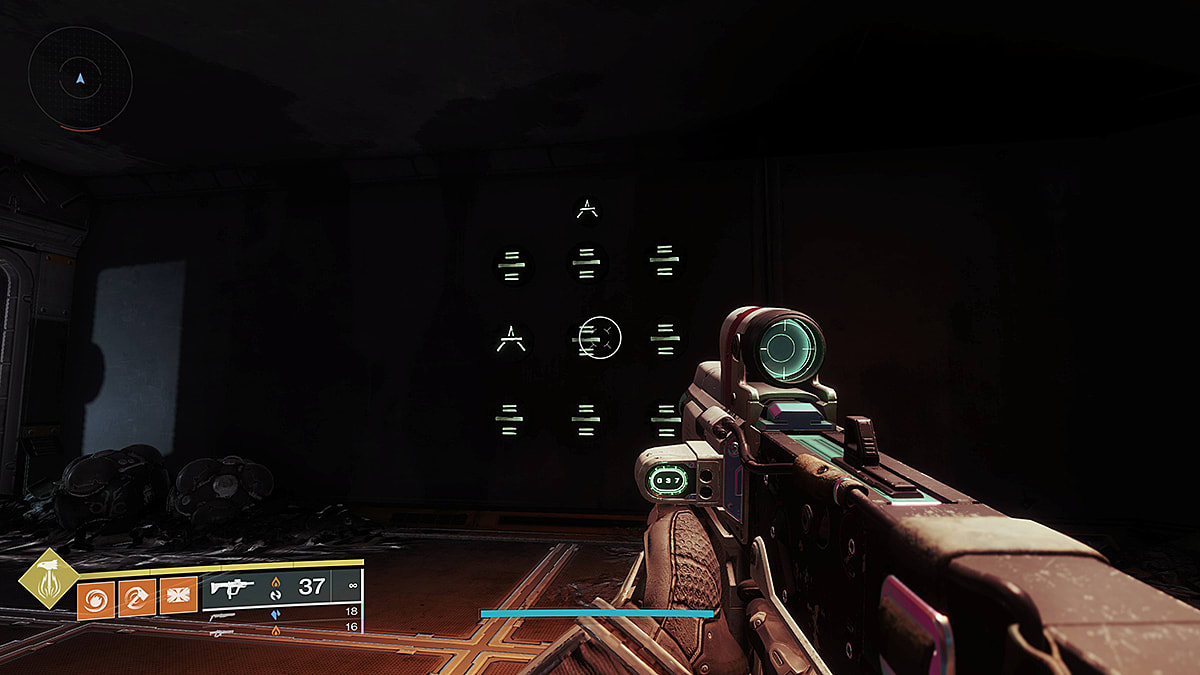
To complete the first step of The Journey quest, activate the statues in the proper order. Approaching them will show the message, “Emerge from the Dark.”
The correct order is below. These positions assume “back” is the side closest to the Pyramid. Once correctly activated, a hidden chest will appear. Open it to start the Journey quest in earnest.
- Front right
- Back left
- Back right
- Front left
How to Complete Emergence: The Journey Step 1
The first step of The Journey Xenophage Exotic quest is called Emergence. Head to the Anchor of Light area on the right side of the Moon. Go to the northwest portion beneath the large, multi-story Fallen structure. There’s a small room there with a fiery altar.
You’ll be lighting a total of 6 Braziers in this step. Pick up the light to activate a 60-second timer. Each Brazier you light resets the timer to 60 seconds.
Brazier Location #1

Screenshot by Gamepur
Go to the small unlit brazier on the floor nearby, and light it to refresh your timer.
Brazier Location #2
 Screenshot by Gamepur
From the small room, head out and hang a left. When you see the other orange Fallen building, keep to the left. On a platform above a blue tarp-covered box is the second brazier.
Brazier Location #3
 Screenshot by GameSkinny
From the second brazier, turn around to the small room across from the large circular structure. The brazier is tucked into a dark corner.
Brazier Location #4
 Screenshot by GameSkinny
Head out the opposite opening from where you entered and go toward the multi-story Fallen building. Clamber into the support beams to find the next brazier at a vertex on the edge of the structure. You can also light this brazier from below if you’re having trouble reaching the beams themselves.
Brazier Location #5
 Screenshot by GameSkinny
From the Fallen building, head directly across the area to a small structure with two large generators. The next brazier is to their left.
Brazier Location #6
 Screenshot by GameSkinny
For the final brazier, jump on top of the large circular building. It’s at the center of the roof.
Once you’ve lit all the braziers, you have one more place to go but an infinite amount of time to get there.
 Screenshot by GameSkinny
From the circular building, head back toward the first and fourth brazier locations at the multi-story Fallen building. Instead of going all the way there, stop near the cliffside next to a Hive altar jutting out of the ground. Deposit the light.
How to Complete Pathfinder: The Journey Step 2
Screenshot by GameSkinny
The second step of The Journey quest for the Xenophage is a bit more straightforward than the first. Your task during Pathfinder is twofold:
- Complete all four Lost Sectors on the Moon
- Solve a brief rune puzzle after the final loot chest
Complete each Lost Sector and loot the last chest to unlock the ability to complete the puzzle safely. The puzzle solutions are below, presented as positions and as numbers as you’d see on a phone. You simply shoot the runes in the following orders:
K1 Communion in Anchor of Light Rune Puzzle Solution
- 7 or Bottom left
- 9 or Bottom right
- 2 or Top middle
- 2 or Top middle
K1 Logistics in Archer’s Line Rune Puzzle Solution
- 1 or Top left
- 7 or Bottom left
- 5 or Middle
- 6 or Middle right
K1 Revelation in Sorrow’s Harbor Rune Puzzle Solution
- 4 or Middle left
- 5 or Middle
- 5 or Middle
- 6 or Middle left
- 2 or Middle top
- 8 or Middle bottom
- 5 or Middle
- 6 or Middle right
K1 Crew Quarters in the Hellmouth Rune Puzzle Solution
- 3 or Top right
- 4 or Middle left
- 5 or Middle
- 8 or Bottom middle
- 9 or Bottom right
- 9 or Bottom right
- 8 or Bottom middle
- 8 or Bottom middle
How to Complete Descent: The Journey Step 3
Steps three, four, and five — Descent, Discovery, and Volmar, the Tempted — all take place inside the Pit of Heresy Dungeon. You’ll only need to complete one of the four main encounters in the Dungeon. We’ve covered everything you need to know about Pit of Heresy in our full walkthrough.
For step three of the Journey, Descent, complete the first encounter and proceed until you reach the wall of doors. Instead of heading down and to your right to the Ogre maze, look up and to your left.
Look for the one door without a rune above it. If you’re using the door directly in front of you as the starting point, the door you want is one level up and two columns to the left.
 Screenshot by GameSkinny
Platform your way to the door and head inside. There will be a Hive runestone within that you can interact with, giving you the next step in the quest, Discovery.
How to Complete Discovery: The Journey Step 4
 Screenshot by GameSkinny
For Discovery, head into the Ogre maze. Rather than ducking into the middle caves, keep left until you reach the cliff. Jump down onto the lower platform until you reach a plate in the ground covered in Hive runes.
Activate the plate to raise three floating platforms from the chasm, with another light ball on the final platform. Grab the light ball, head back to the main area, and go right.
Take the tunnels to the right until you begin seeing red-lit doorways flanked by braziers like the ones you lit at the beginning of The Journey quest. You’ll be able to interact with the second door; don’t worry if the prompt doesn’t populate properly. Interact with both braziers to proceed to the next step.
How to Beat Volmar, the Tempted: The Journey Step 5

Screenshot by GameSkinny
Make your way through the small maze until you reach a starting area with four Hive runes in each corner. These are the four elemental Dread buffs you’ll be using in the boss fight coming up shortly.
As soon as you enter the next room, Volmar, the Tempted, will appear, a boss-level Hive Wizard that’s completely invincible at first.
You and each member of your fireteam will receive a Dread buff based on one of the four damage elements available during Shadowkeep:
- Kinetic (Neutral Dread)
- Void (Abyssal Dread)
- Arc (Thunderous Dread)
- Solar (Fiery Dread)
To damage the boss, you’ll need to collect the light ball in the center of the arena and then interact with the proper rune to activate it and be able to do damage.
- Abyssal Dread: Top left on the upper platform
- Thunderous Dread: Bottom left on the lower floor
- Fiery Dread: Top right on the lower floor
- Neutral Dread: Bottom right on the upper platform
Once you dunk the light, you can damage the boss, but only with the element noted in your Dread buff. All other elements will register as immune. Repeat this process as often as it takes to kill Volmar — and don’t die. A full team wipe (or a single death if solo) will send you back to the start of the fight.
Once Volmar dies and you progress the quest, you can leave the Pit of Heresy Dungeon. Nothing else here matters to get Xenophage.
How to Complete Finality: The Journey Step 6

Screenshot by GameSkinny
All step six entails is visiting Eris Morn and picking up your reward: the Xenophage Exotic Heavy Machine Gun.
The Xenophage Machine Gun you receive won’t be a Pinnacle or Powerful drop. It will be awarded at your current Power level. You don’t have to claim it immediately unless you want to, saving it to fill in a Power gap if you’re optimizing your leveling. However, you can also always infuse it later and get the most out of the weapon as you play.
And that’s how to complete The Journey quest and get the Xenophage Exotic Machine Gun. If you’re looking for additional help with Destiny 2’s collection of Exotics, check out our Gjallarhorn, Unfinished Business, and Winterbite Exotic weapons guides. Our D2 guides hub has much more.
Featured image via the Destiny wiki