There are three new Exotic weapons in Destiny 2 Season of the Seraph, and while getting the Revision Zero Pulse Rifle isn’t the hardest, it does take some work. Once you have The Hidden Shape quest from the Exo Frame, you’ll be sent to complete the Operation: Seraph’s Shield Exotic Mission, a long, which can easily take 45 minutes to an hour. This walkthrough guide is here to help.
How to Complete Operation Seraph’s Shield Exotic Mission
You can find the Director node for Operation Seraph’s Shield mission on the H.E.L.M. screen. You’ll want to be at or around 1580 Power before starting.
How to Infiltrate the Launch Facility
You spawn with the entrance directly to your right, and the main the perimeter towers can kill you in 15 seconds. There’s enough cover to head straight for the door, but you can also circle to the north through the trees and come back down.
You’ll find the entrance to the Seraph complex guarded by an orange bar Ogre. Take him out with whatever you and your fireteam have, and head inside. Follow the path to the left, down through the cave until you reach the clean, sci-fi-looking section with lasers.
How to Reach the Launch Pad Control Room and Activate the Escape Pods
Jump over the first set of lasers and slide under the second, then take a left through the open door. Slide and jump over more lasers to eventually reach a large chamber with four holes to the right and some Fallen enemies.
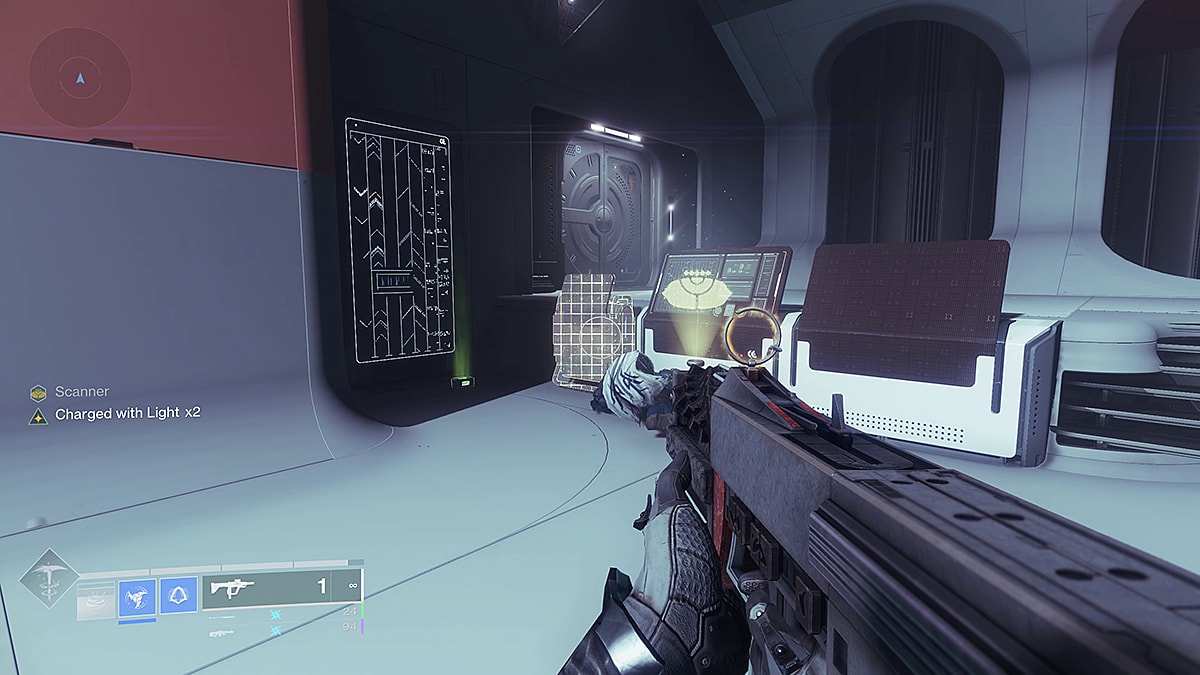
Kill the Scanner Vandal that spawns, pick up the Scanner buff it drops, then clear the rest of the enemies. Scanner reveals which panels you need to activate — they glow bright yellow.
 Screenshot by GameSkinny
Go to the first glowing panel, directly to the left of the Vandal’s spawn point, and hack in. Turn around for the next panel at the back of the room against a computer bank. The final panel is on the right side of the room, across from the Vandal spawn.
With the final panel hacked, four orbital pods will appear in the shafts. Get in one to launch to Seraph Station. Once you exit the pod, turn right, and you’ll see a yellow-glowing terminal next to a locked door.
 Screenshot by GameSkinny
Place your buff into the terminal to proceed.
How to Access the Engineering Sector
After depositing your buff, head through the open doors and up the stairs. Once you reach another chamber with more Fallen, defeat everything, pick up a new Scanner buff, and find the panel to the right of the entry door near the front of the room.
Next, look for an air vent on the left side of the room. Shoot out the grates and crawl through. Activate the Scanner panel you find in the room at the end of the vents, then head back to the first room.
The third panel will be next to the previously locked door. Kill the Servitor beyond the door, jump across the gap, and deposit your buff.
How to Access and Reach the Decontamination Chamber
Follow the path until you reach a large room with lots of Fallen enemies. You’ll see a Scanner Vandal shortly after entering. Clear the room and pick up the buff. The first panel is on the left side of the room behind the pillar.
Directly across from the panel, on the right side of the room, jump into a pathway initially guarded by a pair of Tracer Shanks.
 Screenshot by GameSkinny
Shoot out the grate, and head into another set of vents. Proceed until you reach the room with lasers. Wait for them to deactivate and activate the panel at the back of the area.
Kill the Sentinel Servitor that spawns, and his Shank retinue, then deposit Scanner back into the terminal. The door to the right of the terminal will open; jump up and interact with one of the four consoles on the upper platform. The correct console is on the far right; picking the wrong one will kill you.
 Screenshot by GameSkinny
Head back to the main room, and go through the now-open door immediately to your left. Some slow mines and Shanks will block your path. Clear them and head through. There will be several turrets in the room you reach. Destroy them as you jump up the platforms. Go through the door behind one final turret at the top of the room, and another Scanner Vandal will spawn in the chamber beyond.
Clear this new room and pick up Scanner. At the bottom level, you’ll see an open door with a large window to its left. With Scanner active, look through the window to see where you need to walk to reach all the consoles.
 Screenshot by GameSkinny
If you misstep, the place will seal off, fill with microwaves, and kill you. The path is pretty straightforward, but the floor sensors are finicky; even tapping incorrectly will cause a failure. You have to activate one of the three consoles at each side of the decontamination chamber, at which point the door at the back of the room will unlock, deactivating the floor traps.
How to Access the Officer’s Lounge
 Screenshot by GameSkinny
You’ll enter a smaller room with some more Fallen enemies. Clear them and pick up a new buff: Operator.
With Operator active, smaller control panels will light with a grey glow, and shooting them will activate doors, platforms, and other devices nearby. Shooting the one near the locked door at the back of the room will open the door.
 Screenshot by GameSkinny
There will be some Hive in the next room, and to your left a red-lit area with some exploding Cursed Thrall. The first panel is on the far wall.
Shooting it will open the door to reveal Hive Knights and Shriekers. Clear them and the Cursed Thrall, crawl through the vents at the back right of the room. At one end of the vent is an opening you can’t pass through. Snuggle up close to the blockage and look right for the panel you need to shoot.
 Screenshot by GameSkinny
Head back to the room with the first panel, clear the new set of Cursed Thrall, and look to the pink-lit corner behind a pillar near the room’s entrance.
Traverse the vents, clear the Hive in the room beyond, and head to the window at the back. Shoot the final panel to unlock passage to the next section.
How to Get the West Quadrant Control Room Key
 Screenshot by GameSkinny
Head back through the vents and the open door in the far room. Enemies will be shooting you through it. Clear them until you reach a room with more turrets and plenty of Fallen. A yellow-bar Captain will spawn; defeat it for the key.
How to Draw Attention to Your Location
 Screenshot by GameSkinny
With the room cleared, a Servitor will spawn; once it’s dead, deposit your buff again. Go through the door next to the terminal. Head into the first of three boss rooms, plant your Rally Flag, then shoot the large pile of explosive barrels in the center.
The boss, a large Hive Knight named Haroktha, Scourge of the Helium Drinkers, will spawn.
Initially immune, it will drop its shield, so do as much damage as you can to it. At about two-thirds of its health, it will go immune again and teleport away. Three yellow-bar Brig enemies will spawn alongside dozens of other, smaller Fallen. Clear everything. Remember you’re in a limited respawn zone.
How to Get Captured and Escape the Ketch
 Screenshot by GameSkinny
With the enemies cleared, a door at the back left of the area will open. Defeat the Fallen that appear and take the hallway down until you reach a room with Fallen behind glass. Interact with the glass to “Surrender Weapons.”
A giant Servitor will spawn and teleport you to a cell on a Ketch. You’ll be quickly rearmed by Elsie Bray, and the cell door will open. Proceed out, defeating all the Fallen. Interact with the holographic Fallen hand in the panel on your left to open the door at the far end of the room.
 Screenshot by GameSkinny
Some BrayTech Security Frames will come to assist; you can head to the door at the back of the room, activate another holographic Fallen hand panel, and go through the now-open door. Destroy the turrets to open another door, then destroy more, and head through the force field.
How to Jump the Station Machinery
 Screenshot by GameSkinny
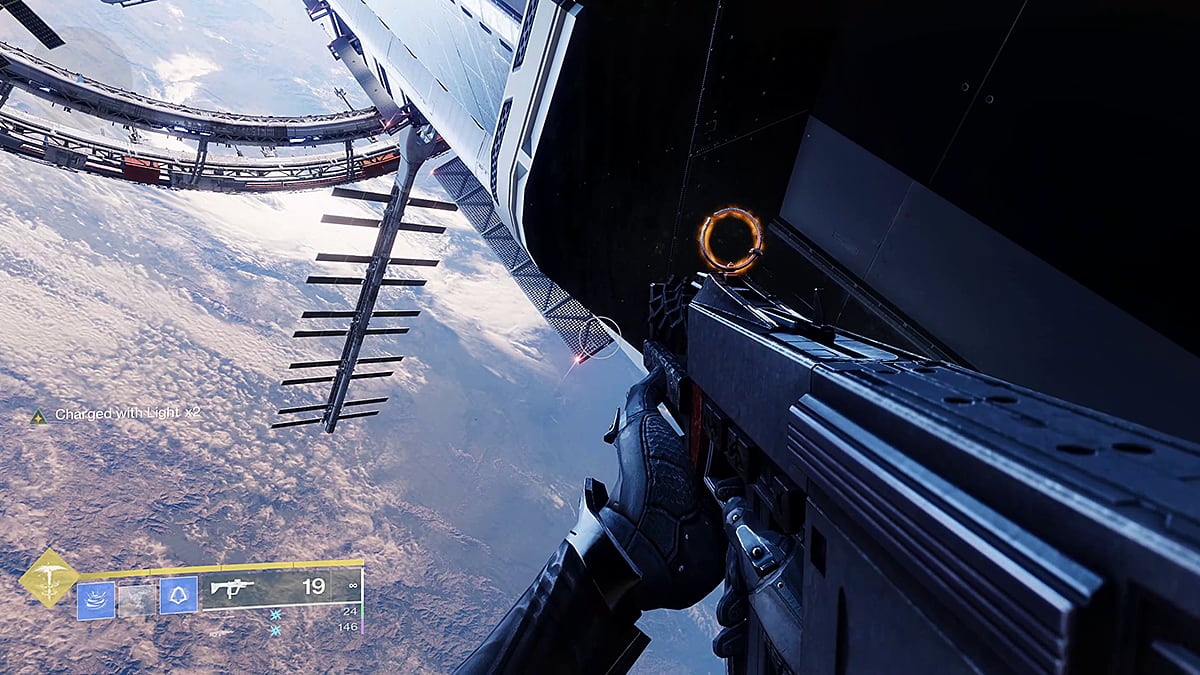
At the end of the platform, look down to see another small jut of machinery far below you. Jump down, and continue down and to the right.
The next thin platform is to the left. Continue straight from there, but be careful of the moving satellite arm. Continue down to the grates sticking out the side of the station.
 Screenshot by GameSkinny
Go straight along the side of the station, across a few gaps, and you’ll eventually see Hive. There will also be Tracer Shanks sniping at you. Keep going until you reach a set of grating platforms with an Operator Vandal.
 Screenshot by GameSkinny
Pick up the buff, and jump onto the far, lower platforms, then look back at the station’s side to see the first panel to shoot.
 Screenshot by GameSkinny
Shooting the panel will extend another platform and unlock another panel at the end of the machinery to your right.
 Screenshot by GameSkinny
The third panel is across the gap.
 Screenshot by GameSkinny
Shoot it to extend the third and final maintenance platform, allowing you access across the gap. Jump up, and follow the platforms until you reach a large chamber with two Ogres and Hive enemies. Clear everything, deposit your Operator buff, and proceed through the door.
How to Reach the Warsat Command Nexus
In the next room, Haroktha will appear again. Kill it this time, and the door at the back of the room will open. Another Operator Vandal will be in the next room with some other enemies. Clear them and pick up the buff. The first Operator panel is to the left of where the buff Vandal was.
Though the nearby door will unlock, don’t take the Scanner buff from the Vandal yet. Instead, head to the panel on the other pillar. Deposit your Operator buff, grab Scanner, and hit the panel in the room with the terminal.
Head across the main room through the now open door, kill the Vandal and turret, and scan the panel.
Head through yet another open door at the back of the room, across from the pillars, and clear the Fallen and Turrets. Grab the Operator buff and shoot the panel attached to the pillar hanging from the ceiling.
 Screenshot by GameSkinny
That will unlock the door keeping you from the other Fallen enemies and the Scanner Vandal. Clear them and the Turret, deposit Operator, and activate the panel in the small room near the containers. There’s now a teleporter active near this room’s Operator panel. Use it to proceed.
Clear the Fallen and the Servitor beyond, use the terminal to deposit your buff, and get ready to fight.
How to Create an E.M.P. Glitch to Access the Bridge
 Screenshot by GameSkinny
In the new area, you’ll see a large, shielded Servitor and three orbs in the air sending out beams of yellow light.
Go to the room’s right side to defeat the Suppressor Vandal, then pick up this new buff. With Suppressor active, the orbs will glow blue standing in the yellow light, allowing you to suppress the Servitor by shooting it a single time.
Using multiple rounds isn’t required, but it is recommended if the hit registration isn’t perfect. A yellow flash will go off if you do things correctly; stand beneath all three orbs to fully suppress the Servitor. Once you do, the door at the room’s left will open, revealing the shield generator. Destroy it.
The Servitor shield will drop, letting you destroy it. Use the terminal near the back door to deposit your buff and proceed. At the back of the next room is the final boss arena. Plant your rally flag.
Seraph’s Shield Boss: How to Beat Praksis the Defiled
 Screenshot by GameSkinny
The final boss of Operation: Seraph’s Shield is Praksis the Defiled, a Stasis-wielding Fallen from the Beyond Light expansion. He has three identical phases: do one-third of his health in damage, and he’ll go immune.
Next, a Suppressor Vandal will spawn. Kill it, take its buff, and stand beneath the three orbs. Shoot Praksis to E.M.P. him and open three doors: two on either side of the room and one below Praksis’ platform. Destroy the shield generators in each room to start damaging Praksis again.
Repeat the process to defeat the boss. Once he’s dead, head to the left side of the arena through the doors, and interact with the computer. Now you’re free to leave the mission. Head back to the Exo Frame in the H.E.L.M. to progress The Hidden Shape quest.
If you made it this far, thanks for reading our walkthrough. Operation: Seraph’s Shield is a long one, and we hope this guide was helpful. For more Destiny 2 Season of the Seraph content, check out our encounter guides for the Spire of the Watcher Dungeon and how to beat the Vow of the Disciple Raid. Our guides hub has plenty more.